Process
- Account Creation
- Basic Setup
- Setting up Calibre-Web for use with your eReader
- Setting up your eReader for use with Calibre-Web
- Setting up Shelves within Calibre-Web
- Adding books to Shelves within Calibre-Web
- Syncing your Shelves to your Kobo
Account Creation
- First create an account on the “Nasmans Library” web page. You can access it on: https://library.nasmans.nl
- On the landing page, click the “REGISTER” button.
- Enter your preferred username and a working email-address. Don’t use 10-minute-mail addresses or the like, I’ll personally remove those. A working address is important to secure your account.
- Click “REGISTER”. Your login credentials will be sent to your entered email-address. If you can’t find the e-mail, check your spam-folder.
Basic Setup
- Login to “Nasmans Library” using the credentials you just created.
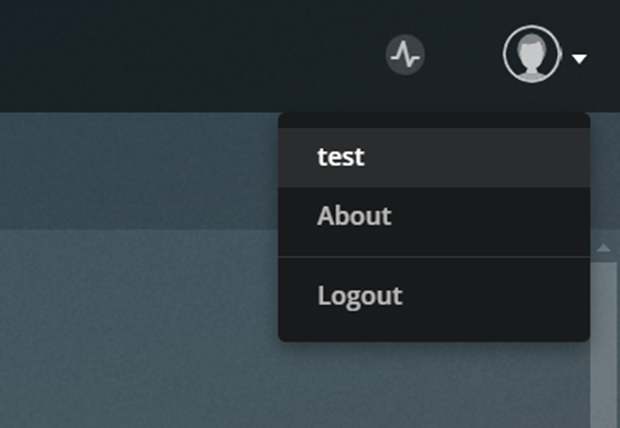
- Your account has been set up using the basic settings. If you wish to change these (UI-language for example) click on the picture in the top-right corner and click your username
3. Check whether the basic settings are correct for you and change your default-password. Press the orange “SAVE”-button at the bottom of the page.
Setting up Calibre-Web for use with your eReader
- Go to your personal settings menu as explained in the previous paragraph.
- THIS STEP IS EXTREMELY IMPORTANT. DON’T SKIP THIS. In your personal settings menu, there is a checkbox that has not been checked by default. It’s titled “Sync only books in selected shelves with Kobo”. CHECK THIS BOX!!!!! If you don’t check this box, your device may try to sync all books in the collection (currently ~13K). This WILL crash your eReader and may even crash the website.

3. Press the orange “SAVE”-button at the bottom of the page.
4. Press the “CREATE/VIEW”-button under “Kobo Sync Token”
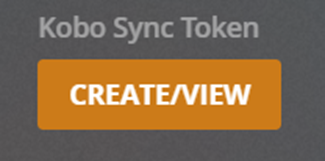
5. A seemingly empty popup will appear at the top of the webpage. It’ll just be populated by three dots at first. Don’t close it! It will take a while to generate a token.

6. After about twenty seconds, the popup will display a strange string of text. In the current version of Calibre-Web there is a small issue with the layout, which may make it hard to read. Copy the complete string and paste it somewhere safe.

7. Close the popup and press the “SAVE”-button at the bottom of the page again.
8. NEVER share your sync token with anyone. It’s a security risk. Don’t bother with the token pictured above, it’s been deleted. The basics of Calibre-Web have now been set up for your eReader.
Setting up your eReader for use with Calibre-Web
- Connect your Kobo-device to your PC. Click the “Connect” popup on the eReader.
- Navigate to the root folder of your eReader using your file explorer. Then, double click the “.kobo” folder. If you’re using Windows, you may need to enable the “View Hidden Files” option: on the top bar of Microsoft Explorer click the tab “View”, then select the checkbox “Hidden Files” To the right of the window.

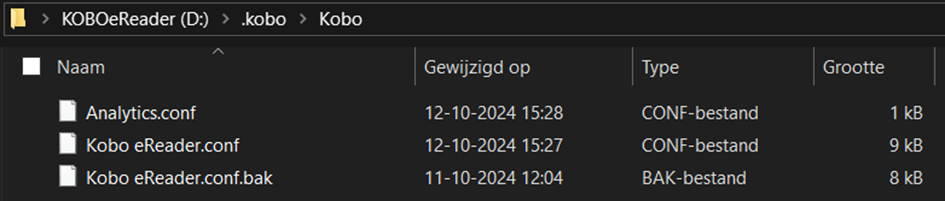
3. Next, open the folder “Kobo”. The path should now be “#:\KOBOeReader\.kobo\Kobo”. The pound sign (#) signifies the assigned drive letter, which may differ per PC, and the name KOBOeReader may be different for different models. The following folders (\.kobo\Kobo) should be an exact match.
4. If you’re in the correct folder, you should see a file named “Kobo eReader.conf” (you may need to enable viewing file extensions, this can be done in the same way as viewing hidden files but check the corresponding checkbox). Duplicate this file (even though, if you followed the prerequisites, you should have a full backup) and rename it “Kobo eReader.conf.bak”. The PC will display a warning about changing file extensions, just click “Yes”. The .BAK-extension signifies it’s a backup. The folder should now look as follows:
5. Open the file “Kobo eReader.conf” in your favorite text editor (Right mouse button on file > Open With > More Apps ↓ > Notepad(++))
6. Scroll down until you see the tag “[OneStoreServices]”. The following line is probably amongst the lines underneath this tag: “api_endpoint=https://storeapi.kobo.com”. If this line is there, replace it with the line we copied during the Calibre-Web setup, if the line is not there, create it according to the following image:

7. If you did everything correctly, the code should now look as follows:

Keep in mind the last part of the code WILL be different for you. It’s recommended to put the line in the same place in the code (underneath the “account_page” and the “account_page_rakuten” variables directly underneath the “[OneStoreServices]” tag (it probably won’t break things if you don’t do this, but why take the risk).
8. Save the config file and safely eject your eReader.
9. Reboot your eReader. If you did everything correctly, the configuration of the eReader is now complete.
Setting up Shelves within Calibre-Web
- Log back into the Calibre-Web interface.
- Navigate to the bottom left corner. You should see shelves here. There’ll be some public shelves and the option “+ CREATE A SHELF”. Click the “+ CREATE A SHELF” option.
- Give your shelf a suitable title. Alsof, select the checkbox with the text “Sync this shelf with Kobo device”. ONLY the shelves where you selected this checkbox will be synced to your eReader. However you design your shelves is your own choice. It may be good to know that “Shelves” in Calibre-Web correspond with “Collections” within your Kobo-device. So it may be a nice strategy to order shelves by category/series/author etc. This depends upon your preferences.
- Finally, click save.
Adding books to Shelves within Calibre-Web
There are multiple ways to add books to add books to shelves in Calibre-Web. I’ll explain the basics of the two most frequently used manners.
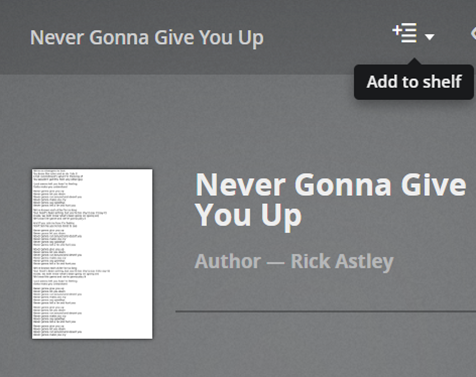
If you wish to add a single book, just search for it using the search bar or use the options under “BROWSE” in the side navigation menu to select your book. Next, click the “Add to shelf” icon in the top right corner and select your preferred shelf.
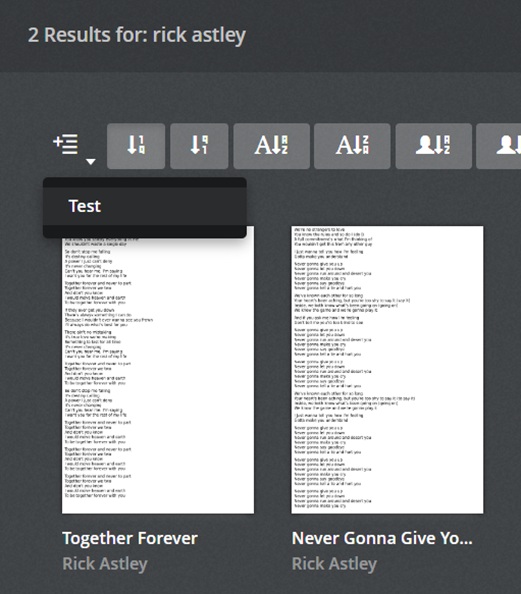
The workflow to add multiple books at once is a little more involved. First, press the option “Advanced Search” to the right of the search bar. Next, you’ll see a window with many options. Choose any option that will result in your required selection of multiple books. In this case I’ll choose “Author”, I typed the name of the author and pressed the “SEARCH” button at the bottom of the page. A result will be returned listing all the books that correspond to your query. The “Add to shelf” button is now in the top left corner. The rest of the workflow is identical to a single book.
Try to play around with the advanced search feature, it’s easy to create extensive shelves in this way. Please try to keep a sensible amount of books on your shelves. Kobo-devices don’t really appreciate being bombarded by thousands of books at once.
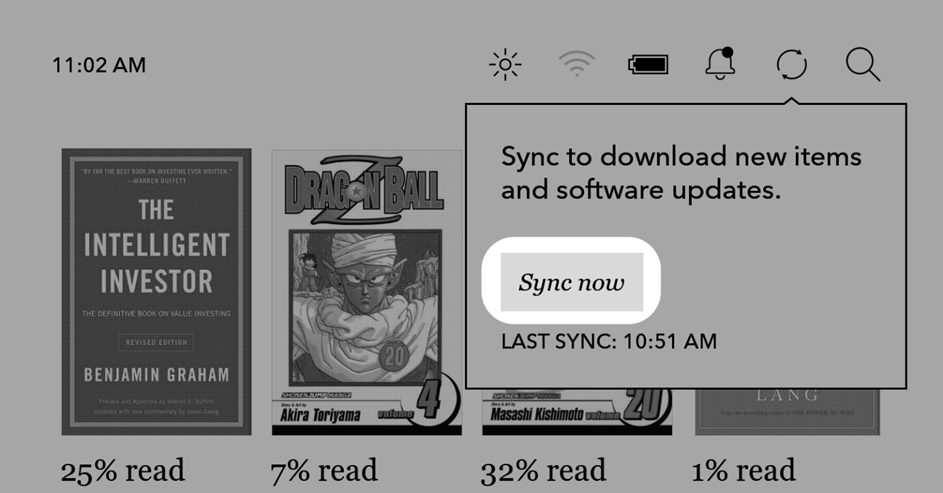
Syncing your Shelves to your Kobo
Now we finally get to the best part. Effectively, we tricked our eReader into believing the “Nasmans Library” is actually the Kobo store. You just have to do two things to do the synchronization, and better yet, you never have to mess with USB-cables/memory cards anymore.
First, make sure your eReader is connected to your Wi-Fi network. If it’s not, just press this icon:

Then, follow the instructions on screen to connect to your network.
Next, Just press the sync button and wait for it to complete! Happy reading!